Install it in this order
- Stay parked for the whole job, including the app setup and the test clip.
- Put the memory card in, power the camera from the cable or adapter that came with it, then format the card in the camera.
- Hold the camera against the windshield and check its live view before you fix the mount.
- Keep the camera out of your line of sight and the cable clear of airbags.
- Save a short clip and play it back before you count on it.
The camera, its mount and the power cable are out of the box, you've got a memory card ready, and the windshield is still bare. We'd get the camera powered, the card formatted and a live picture showing before the mount goes anywhere near the glass, so you choose the spot while nothing is stuck down yet.
Stay parked for all of it, including the phone setup and the playback.
Before you choose a spot, check the rules where you drive. Garmin points out that some state laws restrict what you can mount on a windshield, and that some places regulate recording audio and video or require everyone's consent.
- Put the card in and power the camera from the cable or adapter that came with it, then format the card in the camera using that camera's own method. Formatting erases the card, so back up anything on it before you format.
- Plan the cable's route around the windshield so it stays clear of airbags.
- Hold the camera in place on the windshield, behind the rearview mirror, and check the live view (opens in a new tab) on its screen or app. It should see the road ahead without blocking your view of it.
- Only then fix the mount, peeling off the adhesive cover if yours sticks on.
- Save a short clip and play it back to check the angle.
Everything below is a worked example on the Garmin Dash Cam Mini 3. For another camera, follow its own manual, and for other Garmin models, Garmin's support site (opens in a new tab) has the product manuals.
Worked example with the Garmin Dash Cam Mini 3
The Mini 3 installs with the cable and vehicle power adapter that come with it. Garmin wants it placed where it doesn't block your view of the road or get in the way of controls like the steering wheel, pedals or gear lever. Don't put it in front of or above an airbag, and don't leave it loose on the dashboard.
Pick a spot that keeps the camera at least 20 cm (7.87 in.) from your body (opens in a new tab) once it's installed and running. Plan the cable route so it can't interfere with the controls or an airbag. If you can't find a route you're sure about, we'd stop there and have a vehicle installer route the cable.
Put a compatible card in the Mini 3
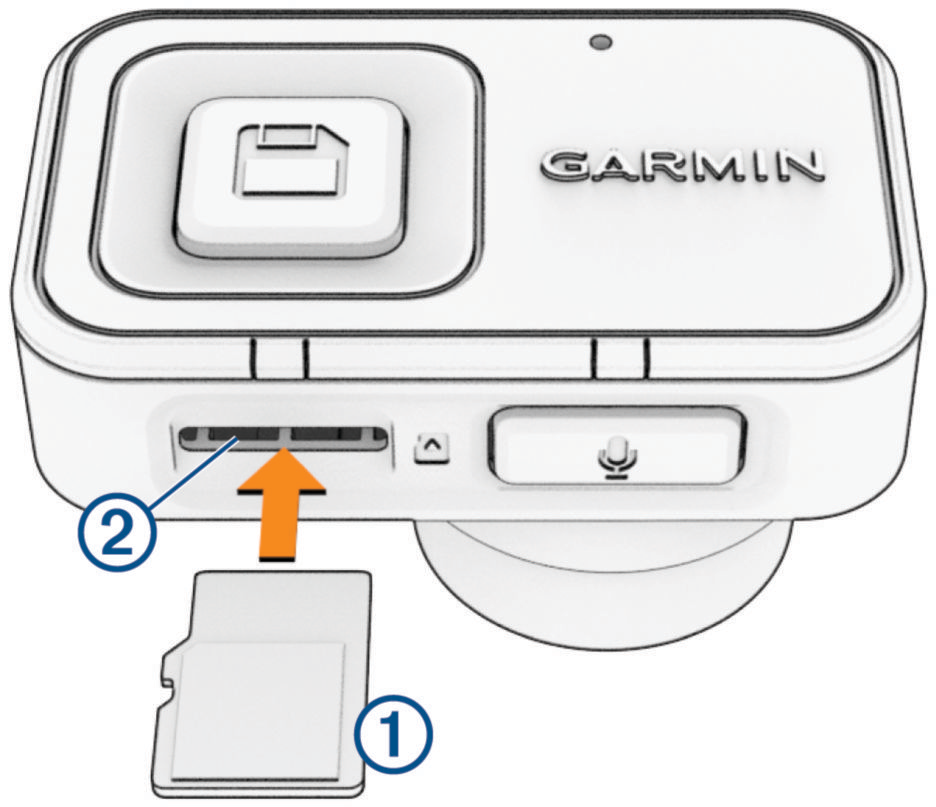
The Mini 3 records to a microSDHC or microSDXC card of 8–512 GB, rated Class 10 or higher, and it needs the card formatted as FAT32. Formatting deletes every video and file on the card, so back up anything you want to keep first.
With the camera unplugged, line the card up the way the illustration shows and press it into the slot until it clicks.
Power, format and pair the Mini 3
Use the included vehicle adapter rather than a USB port in the car. A car's USB port may not supply enough power, and a data-capable cable in one can put the camera into USB mass storage mode, where it can't record or connect to your phone. There's no power button. The camera turns on as soon as it gets power.
Plug the included cable into the camera's USB port, run it along the route you've checked, connect it to the vehicle adapter and plug the adapter into the vehicle's power outlet. If the outlet only works with the ignition on, switch the ignition on. You don't need to start the engine.
Next, format the card if it's brand new or isn't already FAT32. Back up anything on it first. With the camera powered through the included adapter, hold the smaller button with the microphone icon for eight seconds. The status LED turns green while it formats, then red when formatting is done and recording starts. After that, format the card at least once every six months, backing up the footage you want each time, to help the card last longer.
To pair your phone, install Garmin Drive. Keep the powered camera and your phone within 3 m (10 ft.) of each other and open the app. Pair somewhere secure, because not every wireless connection is. If this is your first Garmin device, accept the app's license agreements, or for an additional Garmin camera choose Add Another Device, then select Garmin Dash Cam Series. Hold the large SAVE button with the floppy-disk icon until the status LED flashes blue and follow the app's prompts. Pairing is complete when the main app dashboard appears.
If the status and microphone LEDs take turns flashing yellow, the card is missing or has a problem. Stop there and sort out the card before you rely on recording. Help in Garmin Drive's device settings opens product support.
Check the Mini 3's view before exposing the adhesive
The Mini 3's adhesive mount is meant for long-term installation and can be difficult to remove. It bonds best when the air temperature is 70–100°F (21–38°C) and the windshield is clear of snow, ice and moisture. Outside that range the adhesive may not bond correctly, so wait for suitable conditions before attaching it.
- Clean the inside of the glass where the mount will go, using water or alcohol and a lint-free cloth. It has to be free of dust, wax, oils and coatings.
- Still parked, hold the camera at the spot you have in mind. In Garmin Drive, select Live View and choose the camera if prompted. Use Live View locally through your paired phone here (viewing it remotely needs a Wi-Fi connection and a Vault subscription on this camera). Check that it has a clear, unimpeded view, and that the spot still stays out of your view of the road, away from the airbags and at least 20 cm from your body.
- Adjust the position until the view is right. Only then remove the protective film from the mount's adhesive.
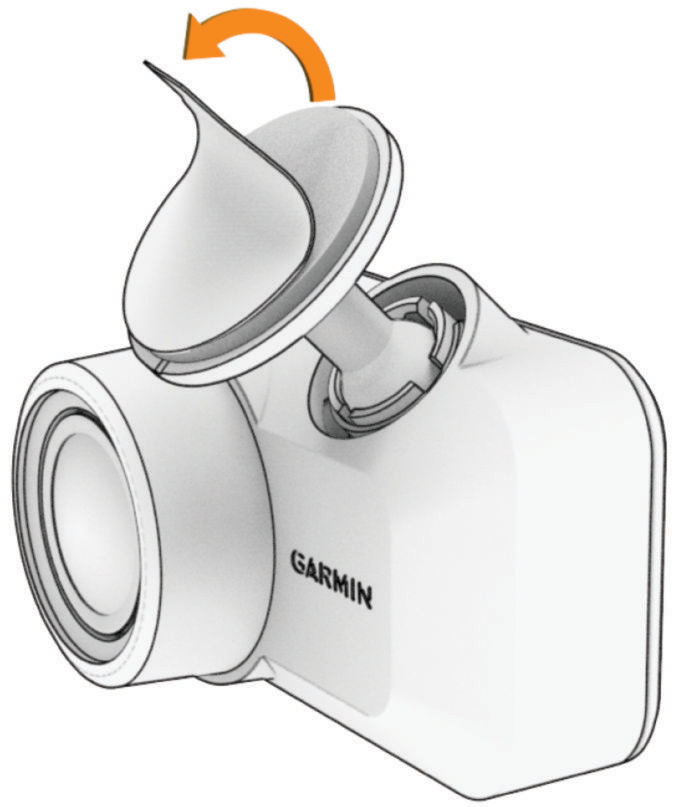
- Line the mount up over the spot. The adhesive is extremely sticky, so keep it off the glass until the position is exactly right.
- Press the mount firmly against the windshield and hold the pressure for 30 seconds so the adhesive makes proper contact.
Save and play back a Mini 3 clip while parked
A solid red status LED means video is recording. The separate microphone LED is red when audio is recording, and pressing the microphone button turns audio on or off.
With the vehicle parked and the camera recording, press SAVE to save a clip. The status LED flashes red while the video saves. In Garmin Drive, select Review Video, choose the clip under Saved and play it back to check the framing and how clear the image is. Then leave the review screen and check for a solid red status LED before you call the installation complete, because the camera stops recording and turns off alerts while you're viewing videos.
If the image needs cleaning, wipe the lens with a non-scratch lens cloth, dampened with isopropyl alcohol if you like, and let it air dry. Skip chemical cleaners and solvents, which can damage the plastic parts. Then repeat the parked recording check.
Save the footage you want to keep before it's deleted. In Garmin Drive's Unsaved Videos settings, Delete When Full records over the oldest unsaved footage when storage fills. Promptly Delete removes unsaved footage older than three minutes, plus all unsaved footage when the camera powers off.
On an ignition-switched outlet, the camera turns off when you switch off the vehicle. To turn it off yourself, disconnect it from power.
More in this category
Continue at the systems desk
More from the wire